Tuesday, 25 December 2012

Christmas Hand-made gift (part 1)

On Sunday 24th of June (2012) I started to think about Christmas, after all it was only six month's til Christmas Eve.  So like I always do I wrote and a list of people I needed to buy or make gifts for and wrote down the things they like.  I really wanted to make the gift's that had a little bit of love put into making the them, than those you buy in the shop's!

While surfing the net to find ideas - I came across a TY Beanie Baby of Mr Bean's Teddy. I first thought prefect, then saw the price near £6.00 - I was like I am not paying that! Like you do :-)  Then I wondered if there was a knitting pattern for Mr Bean's Teddy and yes there is.....

So I got my bag of wool out to find the colours out for Teddy
and my knitting needles and set to work.


I made Teddy for my brother as he love's Mr Bean film's and televison progamme's.
Also my brother about a month before had bought him self a Classic Austin Mini!

So I had decided to play on that fact! 

~~~~~~~~~~~~~~~~~~~~~~~ 

Thursday, 20 December 2012

Just wanted to wish everyone a 
Merry Christmas 
and a 
Happy New Year!

I am also sorry I have not done many post's! 
Has you can guess work and that have got in the way!!!

Wednesday, 28 November 2012

Little Flowers

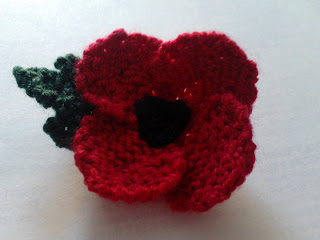
Back in May while knitting the poppies.  I wondered what they may look like in different colour's!
So the next day I decided to have a day off from poppy making,  to experiment with 
different colours - also bright ones too!


Here are some of the colours!


I have been thinking about ways to use them, apart from the brooch like way! I firstly thought of putting one on a Alice band and another one or three on a bag. 
Maybe even a charm or Keyring! 


I have not yet had chance to experiment on my ideas.   Due to work and family stuff!
So some think for me work on in the next few weeks! 


Monday, 26 November 2012

The Humble Poppy (Part 2)


I thought I would up-date you all on how we got on with the poppies!


The poppies went on sell at the end of October and within a few days they were sold out. My mum and I (plus some others) were busy knitting to try and keep up with the demands...

Over £1000 was raised and the money went to the poppy appeal..  So the race is on for next year to make enough and yep you guess it,  I've started already!

I will also keep you all posted how we do this year coming!!! 


Saturday, 22 September 2012

Mum's Cupcake Card!

The first week in August, I started to make notes and write down ideas of how I wanted my mum's birthday card to look.  I knew I wanted to make the card slightly different to what I have normally done in the past.


The picture below is how I wanted the card to look.


I also knew I wanted to put some sort of cupcake or rose on the card.  After making up my mind I decided on having a cupcake on the front as I was ordering a rose for my mum (Which you will be able to read about soon).

I set to work, gathering the materials I was going to use.  I already had the card stock and some of the paper I was going to use.  But I just did not have any cupcake items for card making.

So off I went into town, to see what I could find.  To my knowledge there is only about three places in the town, that sells card making stuff.  One of them is 'The Works'  ( which is a book/stationary/craft store ).  I got some new card and paper stock.  They also had some cupcake embellishments, but not really what I was looking for. 


So I popped into Wilko's to have a mooch round, while I was in there I found Dovercrafts Tea Party 8"x8" Glitter Decoupage pad.  I hummed and arr about getting the Tea party  
    pad, I even walked around the store.  Once I made up my mind I went back and pick it up  
    and went down to the checkout to pay! 


Once I got home I had to hide what I had just bought, as my mum was about.  I wait until mum had gone to bed before I could set to work, with making her birthday card.


I got out one of my already folder purple cards and placed it on the table.  I then folder the front of the card in half again, to make it look like this.

Once I had folded the card I then got out my section of girly gift wrap paper.  It took me a little while to work out which paper I was going to use.  I decided to use two of my gift wrap paper's.  First one is pink with a outline flowers and a pink check effect a bit like a table cloth.  The second one as 'mum' write on it - with bear's and flowers.  

After I had decided on which paper's I was going to use, I cutted them down to size.  I then got my trust worthy double sided sticky tape out and stuck the bears and flowers paper to the back flap of the card.  I did the same with the pink flower paper, but this time I stuck the paper to the front flap. 


Then I got out my Dovercraft Tea Party pad.  I decided to use the single cupcake topper in the pack.  So I pushed out the pieces to the cupcake and then I got out my double sided sticky tape pad's and layed the pieces up, to how I wanted it to look.

Once I had done that, it was time to stick the topper using double-sided sticky tape to the card! 


Mum loved the card I made her and also the rose I got her. 


Monday, 23 July 2012

Hi everyone!
I just want to say sorry if any of my post are mixed up.  The past few weeks I have been having trouble with the layout and saving. Im hoping and praying it will soon sort its self out!
Ever since the EDF energy bought out their new advert with their new little mascot Zingy. 
I fell in love with him -  I know most of the country also fell in love with Zingy.

If you have not ever seen Zingy before, below is a Video of him! 


                            ----------------

Since then I have wanted a soft toy of Zingy, I even went to the EDF energy web site.  To find out they have NO on-line shop and NO Zingy soft toy.  Which I think most of us have been to have a look.

A little while later I wondered if there was a knitting pattern for Zingy.  So I went on-line to search and Bingo!!!  I found one but you had to pay for the pattern, and I was not going to do that.  Then after re-searching again I found another one, a free knitting pattern.  But you had to knit Zingy on round needle's, which I have not yet used.

So I decided to change the pattern so I could use two normal knitting needles.  I used 3¼ needles for the body, eye's and 2¼ needle for the nose.

Pattern for Zingy

  • Using 3¼ needles - Cast on 9sts in the colour for the body
  • Row 1: Inc into every stitch, until you have 18sts
  • Row 2: Knit
  • Row 3: Inc into every stitch, until you have (36sts)
  • Row 4: Knit
  • Row 5: Knit
  • Row 6: Knit
  • Row 7: Knit
  • Row 8: Knit
  • Row 9: Knit
  • Row 10: Knit
  • Row 11: Knit
  • Row 12: Knit
  • Row 13: Knit
  • Row 14: Knit
  • Row 15: Knit
  • Row 16: Knit
  • Row 17: Knit
  • Row 18: Knit
  • Row 19: Knit
  • Row 20: Knit
  • Row 21: Knit
  • Row 22: Knit 2together all along row, until you have 18sts
  • Row 23: Knit
  • Row 24: Knit 1, Knit 2together all along row, until you have 12sts
  • Row 25: Knit
  • Row 26: *Knit 1, Inc; repeat from * until you have 18sts
  • Row 27: Knit
  • Row 28: *Knit 2, Inc; repeat from * until you have 24sts
  • Row 29: Knit
  • Row 30: *Knit 3, Inc; repeat from * until you have 30sts
  • Row 31: Knit
  • Row 32: *Knit 4, Inc; repeat from * until you have 36sts
  • Row 33: Knit
  • Row 34: *Knit 8 , Inc; repeat from * until you have 40sts
  • Row 35: Knit
  • Row 36: Knit
  • Row 37: Knit
  • Row 38: Knit
  • Row 39: *Knit 8 ,knit 2together, repeat from * until you have 36sts
  • Row 40: Knit
  • Row 41: *Knit 4, knit 2together, repeat from * until you have 30sts
  • Row 42: Knit
  • Row 43: *Knit 3, knit 2together, repeat from * until you have 24sts
  • Row 44: Knit
  • Row 45: *Knit 2, knit 2together, repeat from * until you have 18sts
  • Row 46: Knit
  • Row 47: *Knit 1, knit 2together, repeat from * until you have 12sts
  • Row 48: Knit
  • Row 49: *Knit 2together, repeat from * until you have 6sts
  • Row 50: Knit
  • Row 51: Knit
  • Row 52: Knit 1 , Knit 2together, Knit 1, Knit 2together, until you have 4sts
  • Row 53: Knit
  • Row 54: Knit 2together until you have 2sts
  • Then thread the end thorough the 2stitches!

Eye's - you will need to make two!


  • Using 3¼ needles Cast on 15 stitches in white
  • Row 1: Knit
  • Cast Off
  • Using 2¼ needles - Cast on 5 stitches in black for the Centre of the eye!
  • Cast off


Nose
  • Using 2¼ needles - Cast on 2 stitches in black
  • Row 1: Knit
  • Row 2: Inc into every stitch until you have 4sts
  • Row 3: Knit 2togther, twice, 2sts
  • Cast off

How to make up Zingy

The Body

  1. Take the body and sew from the top of the head using invisible stitching. Until you get to the bit the goes in (I call it the neck) before the body.
  2. Using toy stuffing, stuff the head - until you are happy with it.
  3. Change ends and start sewing from the bottom end of the body, still using the invisible stitching. Until you have a opening in the back of him.
  4. Then finish stuffing him. While doing this remember to shape as you go.
  5. Once you have done that finish sewing up.
The eye's and nose


  1. Take one of the white piece’s and sew while curling it flat. Do the same for the other white piece, so you have two white circles.
  2. Do the same with the black piece’s., so you have two black circles.
  3. Take one white and one black circle and sew the black circle onto the white one, to make an eye! Do the same with the other white and black circle.
  4. Sew the eyes onto the head of the body.
  5. Sew the nose just below the eyes on the head.
Your Zingy should look like this!


<   Please don’t to the same mistake as me
and knit the black bits of the eyes on 3¼.
I have made another one but just need to get some more toy stuff
___________________________________


      Just like in the advert Zingy loves the computer.
      I caught him the other night checking out my twitter page!  You can follow me on twitter


      Please let me know what you all think? or How you get on with making your very own Zingy?

    Sunday, 24 June 2012

    Learning to Crochet

    Since I was a little girl I have watched my mother crochet granny square's.
    Until six years ago I never knew that there is loads of different ways to crochet.

    Please find picture of Granny Square below!
    dorsetbotanybee
     
    On and off over the past five years I have been trying to learn those square's.
    Well ermm....  My square's well they turn out like circles.


    Please find picture below!
    The pink one was my first ever one I made. 
    It curls in looks like a little hat, Ive flatted the pink one for the picture!
    I decided to leave the learning a lone for a while.

     Until a close friend of the family brought round her Art of crochet set for me.
    I started learning again, at the moment I am not learning granny square's.

    I have been trying to learn one of the square's in the book.
    The square below was made by my friend who gave me the set.


    Below is the one I tryed to do, I know it's not a square.


    Then I decided to experiment and the picture below is what I came up with.
     

    Then yet again I gave up! I know shame on me :(

    Last week my mum remember one of the ways my nan use to crochet. 
    Mum started us off then I took over to learn, then mum checked the work I did and finish the piece off!

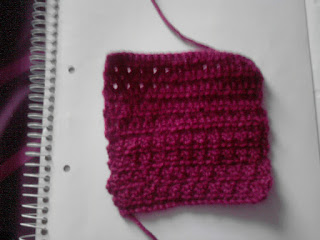
    Between mum and I we made this!


    Last night I decided to have a go my self.
    At first I found it was a little hard,  but I got there in the end!
    This is what I made!

    Please let me know what you all think?


    Thursday, 31 May 2012

    Aunt's Birthday card (1)

    Two weeks ago I started planning and designing my aunt's Birthday card.  I made a list of all the things that she likes, just like my Unlces 70th (which is her hubby).  My aunt is into fish's, westie's (dogs), cats and knitting. The theme I went for was fish, cats and knitting. I'm going to do westie's for Christmas, which I'm going to be making in the next few weeks. 
     I knew I was going to use the same template as
     my mum's 'mother day card'


    Last week I did an special order for some die-cut cats, fish and knitting needles.  I found the cat and the fish, well fishbowl with fish, but could not find any think to do with knitting.  So I made my order and waited, I only needed to wait a day before my small parcel came.
    I got out my craft mat, knife, double-sided sticky tape, embossing tool, ruler and sticky pads.  Then I looked out a peach colour card and envelope.  Then I popped the envelope to one side and opened up the card and layed it down on the mat.   I then took my embossing tool and ruler to mark the line across the top of one side of the card .  Then I took my craft knife and cut along the line I had made.


    I used the same wrapping paper as I did for my mum's 'Mothers day card'.   This time I used the striped paper as the backing. Once I had stuck down the backing paper I made two square's from the same coloured card stock as the card and stuck on the wrapping paper.

    I took the piece's to the fishbowl and made that up.  Then I got two cocktail sticks out and some pink wool. I then cast on about six stitches and knitted some row, it was hard work. But I got there in the end!  I then got some beads out and cut the end of the cocktail stick off.  I got out my trim-it glue and stuck the beads onto the end of each stick and made a little ball of wool. Then I stuck the knitting down onto the one of the squares I had made, and left that to set.  I got one of the cats out of the little bag (of 10) that the their came in, I had a small bit of card left over from the square's so I used that for the nose and two little gems for the eyes.

    After that it was time to stick on the items. So I got my sticky-pads and stuck the square of the knitting on the left hand side in the middle of the card. I then got the fish bowl and again popped sticky-pads on and pop the fish bowl down the bottom on the right hand side of the card, just over lapping the square with the knitting on.  After that I did the same with the cat, but this time I pop the him up the top on the right hand side.

    Please find picture's below:


    To finish the card off, I cut to size an insert (saying: Wishing You A Very Happy Birthday). I popped a strip of double-sided sticky tape on one side of the insert and popped that in.

    Please let me know what you think of the card..
    I am now on twitter @Dorsetbotanybee

    P.S... My uncle loved his Birthday card! I should find out over the weekend what my aunt thinks of the her card, I have a gut feeling she will love it!

    Saturday, 12 May 2012

    70th Birthday Card

    Two day after putting my aunts birthday card in the post.  I started designing my uncles 70th birthday card.  I wrote down all the things he is into.  Which to be honest is not a lot, in the end I decide on the one main thing. The thing he is always up to when I phone, in the garden! So as you can guess I decided on a Garden theme.....

    A few day's later, 18th April I sat down and set to work, making his card.  I took a lime green blank card and envelope, then I popped the envelope to one side.  I then put the card onto my craft mat and got out some white cardstock.  Then I measured
     the white card against the green card making sure the white card was 1cm smaller on the sides and 4cm top and bottom.  I then got out a Christmas green cardstock and cut that 1cm smaller on the top, bottom and sides, than the white card. The same again with the white card.  I hope I have not confuse any of you! 

    I took the large white square and stuck that onto the lime green card using double-sided sticky tape.  The smaller green and white card I stuck on using sticky pads.

    After laying the squares up, it was time to put on the little garden items I had bought specially..

    I firstly put the sliver watering can on the white card unsing trusted double-sided sticky tape.  Then I used sticky pads to stick the strip of green grass down.  The same for the folk and the little folk plus trowel. I also use some trim-it glue to stick them to the grass.

    The picture below is how the card looked.

    I left the card for a little while because I wanted to get a add-on that said " Happy 70th Birthday".
    But I was un-successfully on finding a add-on that said that, :( so back to the drawing board....

    ~

    The first week of May I went to the newly open The Range in my area.  I have to say the Range have a fantastic craft section in store, not online it rubbish! If you ever get a chance to go to one, You must go!

    While I was there I got a few things, some peel-off's the Docrafts Creativity magazine and a
    pack of Papermania add-on's.  


    Once I got home, I set up my work table and got out my uncles card.  I picked out a 'Happy Birthday' (from the add-ons that I had just bought) to suit the card. Once I had picked out the add-on that I wanted to use, I got out my little sticky pads, to stick the Happy Birthday on the card.  I also got out my number peel off's. I popped a 70 on the Watering Can.
     
    Here is the picture of the card now!


    My uncle's Birthday isn't til two weeks time! So I will let you all know what he thinks.
    P.s. Please let me know what you think? 

    Monday, 16 April 2012

    Aunt's Birthday Card

    At the end of February I started to plan and work out my Aunty's Birthday card.  I wanted to do a art deco style card, but at the time I could not find what I was looking for.  Until I went to Readicut, I found what I was looking for!  I made my order every think was going to plan til I had an email to say sorry we are having trouble with your order.  Later I found out they had trouble with getting stock, I ended up cancelling my order.  So back to square one I was - until I bought my fave magazine Lets Make cards . After reading the magazine cover to cover and writing down some webby sites to check out.

    Working my down the list of webby site I made I came across one, that saved the day for me.  I joined and made an order up, about two days later the parcel came.... I was and still are thrilled to bits with the items I bought...  After making a cuppa tea I sat down and set to work on my Aunty's Birthday card..

    I should say at this point that I could not find any art deco stuff.  I just hope she loves it still!

    Anyway I got out my pastel cards plus envelopes and picked out pink. Has this is my aunts fave colour, then I pushed out the layers of the topper and the pink and black pieces to the boarded.  I then got out my double sided sticky pads, to help layer up the piece's of the topper...  Once I had finished that I then cut the pink strip along the bottom to size.  Then I stuck the topper on and the pink strip with the black one on top.  I knew I had some paper flowers so I got out a pink plus purple one and stuck them on with a pink gem stone that my aunty had bought me a while back. The last item I popped on the card was 'Happy Birthday' Not sure if you can see it very well as it is on the black strip!

    Please find below picture!

    I have to say I love this card, just got to work on my unlce's birthday card now! I will keep you all posted...

    P.s: Please let me know what you think?

    Thursday, 5 April 2012

    21st Birthday Card

    Hi Everyone! Sorry I meant to put this one on at the end of January.


    A while ago I blog about learning a new card making technique called diamond .
    After learning and practising the technique, I could not wait to make one for a family member or friend.

    At the beginning of the year I started to plan my brother's birthday card.   I knew I was going to do the diamond effect and because it was my brother's 21st, I was going to put a 21 on there......

    I had some blue card stock so I folded the card to match the template (I had made before) and popped that to one side. Then I got some pattren paper out and cutter out one square a bit smaller than the top part of the card and the strip for the base of the card. I then stuck the paper onto the card. I thought it was a bit too jazzy, so I found a small blue square of card and a smaller pattern square and stuck the card and paper on. The pattern paper I used was gift paper from the card factory.

    I then got out my sliver shiney card and drawen to lines with a grap between. Then  I drawen the words ' Happy Birthday' and cut them out. I just wished I could get my letter prefect.


    One of the last thing's I needed to do was the 21. So I got out some gorgeous gold glitter card I bought for Christmas and drawed a 21. Then I cut out the 21 and stuck both the 'Happy Birthday' and the 21 onto the card.

    Find picture's below!!!


    P.s: Please let me know what you think?

    Thursday, 22 March 2012

    Mother's Day Card

    After making sure I got mum her Mothers Day Gift, which you can read about on My Little Garden Heaven.  I knew I had enough time to plan and design my Mothers Day Card.  But bad luck hit me, I caught that flu/cold virus thing that is about at the moment.  So all I did was sleep which was just great as it was my week off work.  Once I got over the worst of the flu/cold, I thought if I did not start now I wont be making mum a card.  So I wrote down my ideas and drawn a template of how I wanted the card to look.  I knew I wanted to put the word 'Mum' in the top corner, then a flower somewhere in the middle and a doggie on the bottom.


    Here is my template below.


    Once I did my template I made sure I had the papers and materials.  After making sure I had every think I needed to make the card.  It was time to have fun and get creative, this is always the best bit. :-)

    I got a piece of my white card stock out and cut a piece in half and then folded that piece in half, to make a small card.  Then I cut a triangle piece off the top of the opening side, then I put it to one side.  I then made the squares and the word 'MUM', I even cut the piece of backing paper out ready. I used my peel off marker pens (which I got for Christmas) to colour the word 'MUM'.  Then it was time to stick the backing paper onto the card and the finished squares onto the card. 

    I had a template for a dog standing, so I modified him to be sitting down and covered him with pink paper then stuck him onto the card.  The only thing left to put on was the flower.  I went thorough all the colours I had starting with blue then trying the pinks and yellows, I went back to the blue one I started with.  So I stuck the blue flower on and popped a gem in the middle of it.

    Pictures below!

    If you have read my 'Mothers Day gift' posted, you would know how I got told I shouldn't have got her any think.  The same again I was told I shouldn't of got her a card.
    I have to say mum loves her card! She is still making lovely comments about the card.